
KYC for Corporate Treasury Help Centre
Adding Members
Members are a foundational component of your Clinked account. Members need to be added to be participants in group(s).
Members can be added at either the Account level or the Group Level.
At the Account level,
Account Administrators ("Super Admins") have the capabilities to add members to the account, assign their access to groups and set the member's account and group capabilities.
At a Group Level,
Group Administrators ("Admins") have the capabilities to add members to the group and set their capabilities at the group level.
We will explore both administrator options in this article based on each one's experience and needs.
Account Administrators
As an Account Administrator of your Clinked account, you have the capabilities to manage Account Settings & Account Members. These will be shown in the top banner of your Clinked Account, however other members without "Super Admin" capabilities will not see these on the banner. As the Account Administrator, you have full Account Rights and can see into any Group even when not a member.
To add members at an Account Level, Account Administrators need to navigate into the Members section to both invite members and create members
There are 2 key ways to add members at the Account Level:
-
Invite Member - will immediately invite the member using only their email address - members will then be prompted to set up their member profile (i.e. user name, full name, etc). This is useful for groups requiring minimal permission set up, using tags based systems or internal team members.
-
Create Member - will create members without sending email invitations allowing a staging of their access. This is useful when staging groups requiring content permissions who can then be invited after set up is complete. An Account Admin will be required to set up a member profile (i.e. user name, full name, email address, etc), and this can be done via CSV upload.
Inviting Members
-
Click on the Members icon (see below) to open the Members area
-
Use the green "+ Invite Members" button (see below)
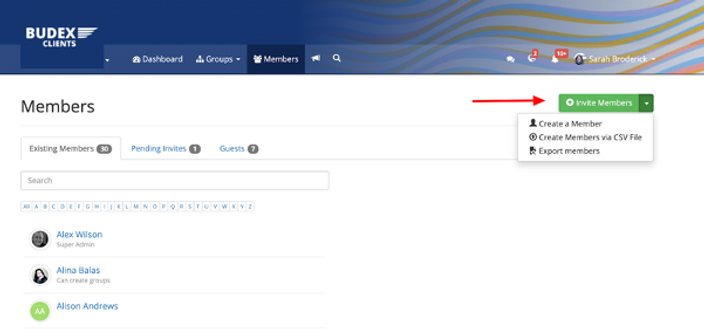
Invite New Member window will open from the Account level members dashboard (see below). Complete the following:
-
Entering email address(es) or select from ‘add people from...’ list
-
Assign Account Rights: granting capabilities at Account Level
-
"Member" assigns a member who can't create groups and is not an admin
-
"Group Creator" assigns ability to create new groups
-
"Super Admin" grants ability to be an Account Administrator
-

-
Then choose the group assignment for the member:
-
Assign Groups: granting access & setting capabilities at Group level. Select 'Add more groups' to assign a member to a group. Simply select the group to assign.
-
Choose member group rights:
- Basic: is a basic member, e.g. can read/view and comment on documents
- Standard: is content contributor, e.g. can upload & collaborate on content
- Admin: this a group admin- can invite members into the group and access the group settings -
Invite Message: text for email invitation to be sent to above entered email address. This can be edited.
-

-
Hit Send Invitations: Member will receive an email invitation to join your Clinked account
-
Accepting Invitation: The invitation will prompt the member to create their member profile. This includes them choosing their user name, entering their full name, defining a password and any other properties defined by your team before entering your Clinked environment.
Creating A Member
-
Click on the Members icon (see below) to open the Members area
-
Use the DropDown button to the right of the green "+ Invite Members" button and select "Create A Member"

-
Create a Member window will open (see below). The Account Administration will then set up their profile with the following:
-
Full Name
-
Email
-
Username (note: this will not be able to be changed after setup)
-
Phone Number
-
Enable: Check off the box if you'd like this member to be active upon setup. If not, leave unchecked & come back when ready to enable them (see notes on this below)
-
Account Rights: granting capabilities at Account Level (Not required)
-
"Can create groups" assigns ability to create new groups
-
"Super Admin" grants ability to be an Account Administrator
-
-
Password: enter an optional password if you'd like to provide later
-
Assign Groups: granting access & setting capabilities at Group level
-

-
The member will be created in the Account & be seen in the Assigned Groups. However, the member will not have access until advised by your team or you Send Activation Link via email.
To invite a member after setting up their access as desired, they can be invited through two processes:
-
Select Send Activation Link
-
Ask to log in during your designed client onboarding
The Send Activation Link will prompt the sending of an automated email invitation from Clinked. Below are instructions:
-
Navigate to Member's profile in the Account Member area
-
Open the settings in the top right corner
-
Select Enable Member, if not yet done
-
Select Send Activation Link:

Complete the additional details - email message & when it should ben sent (i.e. Send straight away or custom time & date) - then hit Send

Create Members via CSV File
Account Administrators also have the capability to mass create members via a CSV file. Again, this can be done from the Members area.
-
Click on the Members icon (see below) to open the Members area
-
Use the DropDown button to the right of the green "+ Invite Members" button and select "Create Members via CSV File"

-
Create Members via CSV File window will open (see below). Follow the instructions to set up your CSV file & see the Download Sample file to aid

-
Press the green ‘Upload’ button to upload a CSV file once ready
-
Member will be created in Account & be seen in the Assigned Groups. However, the member will not have access until advised by your team.
To invite a member after setting up their access as desired, they can be invited through two processes:
-
Select Send Activation Link
-
Ask to log in during your designed client onboarding
The Send Activation Link will prompt the sending of an automated email invitation from Clinked. Below are instructions:
-
Navigate to Member's profile in the Account Member area
-
Open the settings in the top right corner
-
Select Enable Member, if not yet done
-
Select Send Activation Link:

-
Complete the additional details - email message & when it should ben sent (i.e. Send straight away or custom time & date) - then hit Send

Group Administrator
-
As a Group Administrator of a Clinked group, you have the capabilities to manage Group Settings & Group Members. These will be shown in the top right of your Clinked Group. Other group members without "Administrator" capabilities will not see the Group Settings on the group banner. Other group members will also be able to see the Members section unless the group has been designed as "Restricted" where no members can see each other.
-
To add members at a Group Level, Group Administrators need to navigate into the Group Members section to both invite new members and assign members. Because members can be parts of one or many groups in Clinked you are able to search for existing members of other groups to add or invite new members directly into that group.
-
There are 2 key ways to add members at the Account Level:
-
Invite New Member - this will be used to invite people not yet a Member of any other group. By selecting this option, Clinked will immediately notify the member via email invitation.
-
Assign Member - this will be used to invite people already members of other group(s).

The process for both is similar with the exception of the first option:
-
Selecting the "Invite or Assign Members" green button
-
To Invite Member: Enter Email Address
-
To Assign Member: Search using "Or add people from" to see a list of other members connected across your group(s)
-
Choose member's capability: check or uncheck the boxes for "can create content" & "administrator" to define member's capabilities as explained below:
-
What does it mean to be an ‘administrator’?: Group admins can control the settings of the group. They can create content and assign permissions to files and folders for other members to access. They can invite people to be members of the group and assign manage member’s type for the group.
-
What does it mean to select ‘standard’?: These members can create and upload content, they can also share content with guests. They can download and comment on content. They are able to select files for signature.
-
What does it mean to select 'basic'? These are considered a Group Member with basic capabilities- they will be able to view, read and download files. If you want them to view documents but not edit anything, assign them as a basic member.
-
-
Notify Existing Members: check off the box, if needed.
-
Invite or Assign: Invited Member will receive an email invitation to join your Clinked account. Assigned Members will have access granted.
-
Accepting Invitation: The Invited Member invitation will prompt the member to create their user name, password and profile before entering your Clinked environment.
We hope this helps get your up and running with members in your account and groups. Please see our other articles to explore other areas. Below are a few that may help: